Sew the bottom of the lining body assembly to the top of the body facing assembly, right sides facing and matching seams.
Hand-stitch the facing/lining seam allowance to the vest body's interfacing layer, being careful not to stitch all the way through the layers to the outside of the garment.
Pin the lining to the open edges of the vest - the armholes, neckline, and center front.
Baste or sew the lining to the body, ⅛" or ¼" from said edges.
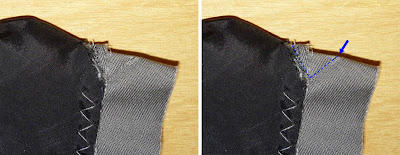
For the Sisko version, the armhole trim is a bit more involved; the mitered pivots at the bottom of the armhole require a special technique.
Then, fold it in half at the pivot, matching trim lines.
Using a very short stitch length (such as 1mm) and a zipper/piping/edge-stitching foot, stitch along the edge of the clip, then stitch back to the folded edge of the trim in a mirroring line.
Clip the trim vertically at the fold to the corner of the stitch, and also clip the fold itself from the outer edge to the stitch line.
Unfold the vest and press the trim away from the yoke.
Fold the trim under.
Fold the raw edge underneath again and pin in place - in other words, in the same manner as you would attach double-fold bias tape.
Using your quilting/walking foot and gray thread, "stitch in the ditch" along the inner edge of the bias trim.
The bottom of the armhole trim should be flush with the top of the yoke trim from the side seam to the miter.
Repeat for the other side.
 We'd like to extend a special thank-you to Kenneth King, author of Cool Couture, as his online "mitering a Hong Kong finish" tutorial was instrumental in helping us reverse-engineer this mitering process!
 PREVIOUS: Tutorial, part 12a - Lining to Body (Picard version)
NEXT: Tutorial, part 13 - Neckline Trim


No comments:
Post a Comment